The Email Blacklist Add-on for Gravity Forms is a tool designed to block form submissions based on specified email addresses or domains. It effectively prevents spam submissions, competitor information gathering and unqualified leads from entering your system, ensuring cleaner, high-quality data collection.
Administrators can define a blacklist of domains that trigger validation errors or capture and mark the entry as spam when used in any email field. Global default settings for both the blacklist and validation messages can be configured for consistency across all forms, while still allowing for field-specific overrides when needed.
Email Blacklist Formatting
An email address follows the format local-part@domain, where the local-part contains alphanumeric characters and permitted special characters, and the domain includes a hostname and a top-level domain (TLD), separated by dots, in line with DNS conventions.
The Email Blacklist Add-on for Gravity Forms enables you to block entire email addresses or specific components using wildcards. Below are examples of how to implement these rules effectively.
Block Full Email Addresses
To block an entire email address, simply add the full address:
- Example:
[email protected]
Block by Local Part
To block emails based on the local-part (the section before the @ symbol), enter the desired pattern:
- Example:
jsmith@*
This will block all emails starting withjsmith@, regardless of the domain.
Variations like[email protected]or[email protected]will also be blocked. - Example:
*smith*@*
This will block all emails containing'smith‘ in the local address - Example:
*smith@*
This will block all emails ending with'smith‘ in the local address
Block by Domain
To block emails from a specific domain, enter the domain name:
- Examples:
example.com– Blocks emails fromexample.comonly.*@example.com– Blocks all emails fromexample.com.sub.example.com– Blocks emails from the specified subdomain.
Block by Top-Level Domain (TLD)
To block emails based on the TLD, use an asterisk (*) as a wildcard:
- Example:
*.com– Blocks all emails from.comdomains.
Block Multiple Emails
The methods above can be used to block multiple addresses or patterns using a comma-separated list:
- Example:
[email protected], example.com, *.com
This format ensures flexible, precise control over email submissions.
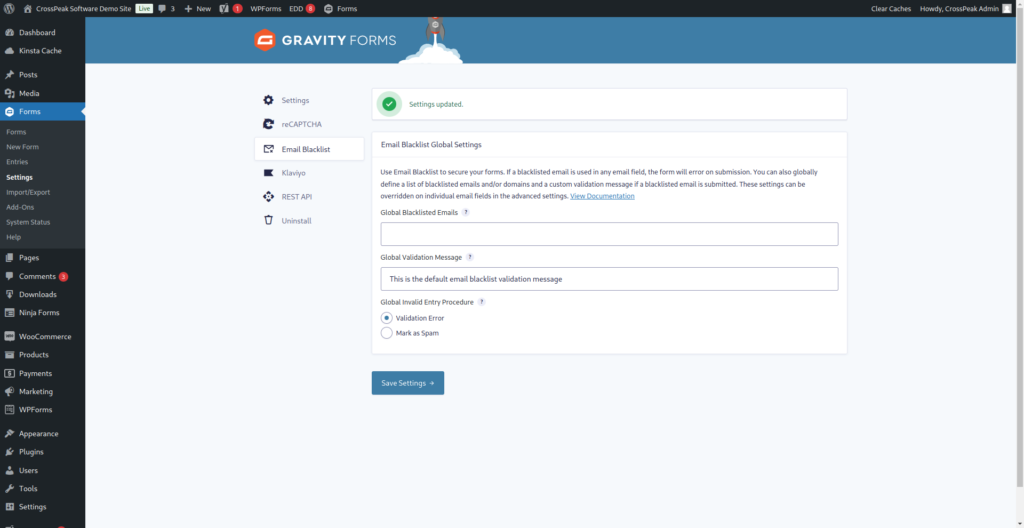
Global Blacklist Settings
Once set up, these settings will apply to all email input fields across all Gravity Forms used on the site. They can be overridden by individual email blacklist settings.
- Log in to your site and navigate to Forms > Settings > Email Blacklist.
- In the Global Blacklisted Emails field, enter a comma-separated list of blacklisted domains (e.g.,
hotmail.com), email addresses (e.g.,[email protected]), and/or use wildcard notation to block top-level domains (e.g.,*.com). These settings can be overridden in individual email fields under advanced settings. - In the Global Validation Message field, enter a default error message that will display if a blacklisted email is submitted. This setting can also be overridden in individual email fields.
- Select the Global Invalid Entry Procedure to determine how the blacklisted submissions should be handled, with validation error or collected and marked as spam.
- Click Update Settings to save your changes.
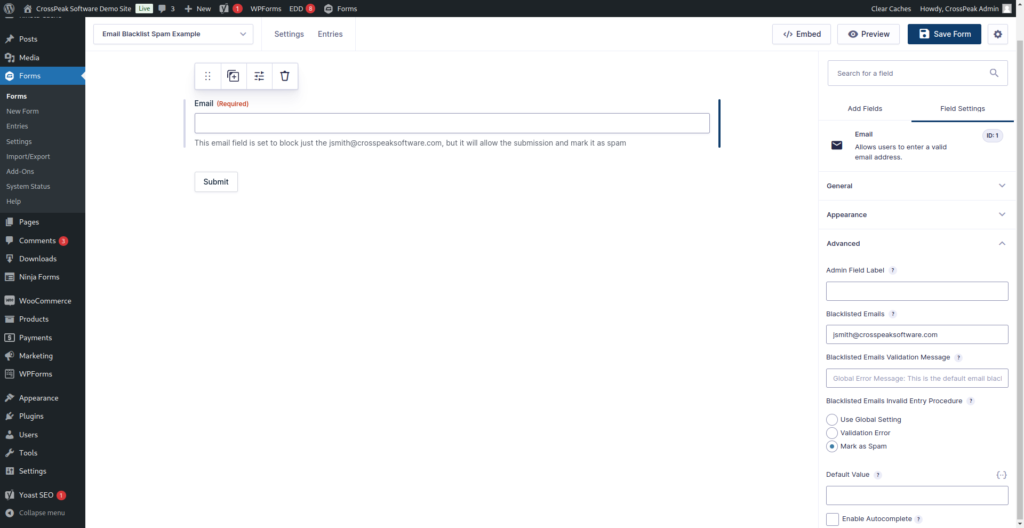
Individual Email Input Blacklist Settings
These settings apply only to the selected form and override the global blacklist settings.
- Log in to your site and navigate to the Gravity Form you want to update.
- Add or edit an existing email input field on the form.
- Go to the Advanced Settings tab for the field.
- In the Blacklisted Emails field, enter a comma-separated list of blacklisted domains (e.g.,
hotmail.com), email addresses (e.g.,[email protected]), and/or use wildcard notation to block top-level domains (e.g.,*.com). To bypass the global settings and allow all email addresses, enternone. - In the Blacklisted Emails Validation Message field, enter an error message to display if a blacklisted email is submitted. This setting overrides the global validation message.
- Select the Invalid Entry Procedure to determine how the blacklisted submissions should be handled, with validation error or collected and marked as spam.
- Click Save Form to apply your changes.